
Checking the Versions
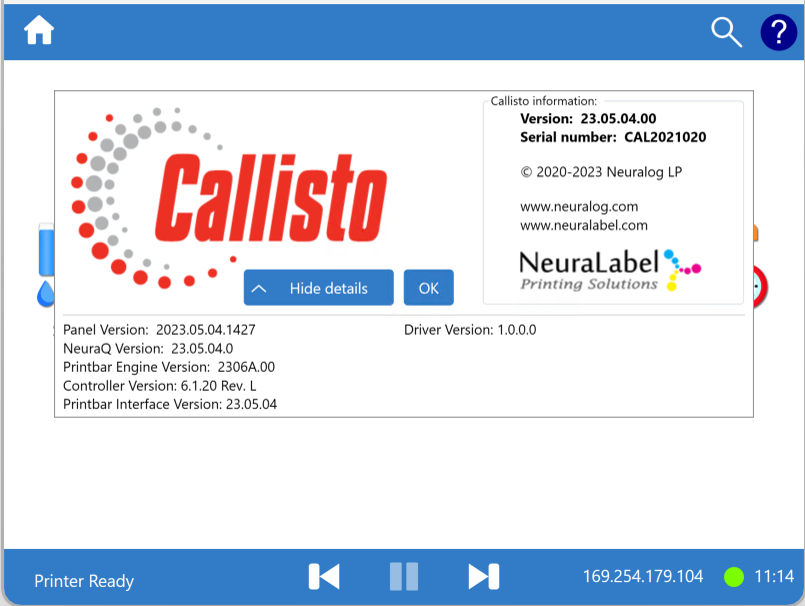
The Callisto version information can be viewed through the Operator Panel by selecting the “?” symbol in the top right corner of the Operator Display. The main version is displayed in the Callisto information section above the printer Serial number. In this example, the version is 23.05.04.00 for Callisto printer CAL2021020. Subcomponent versions are displayed in the lower section of this screen.
Panel represents the version of the Operator Panel software, the part of the printer that the user sees on the display.
NeuraQ is the data processing component for the Callisto engine.
Printbar Engine refers to the firmware that drives the base printer engine.
Controller represents the firmware that runs on the controller or OEM2 board. This board controls motors and sensors. The hardware board revision is also displayed.
PrintBar Interface represents the communication module.
Watch the Installation video to see it in action.
Accessing the Printer Update Panel
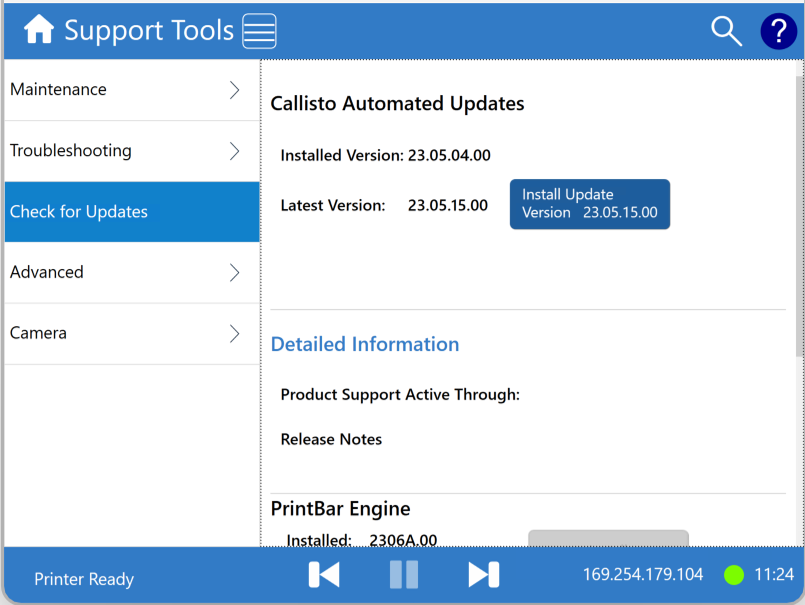
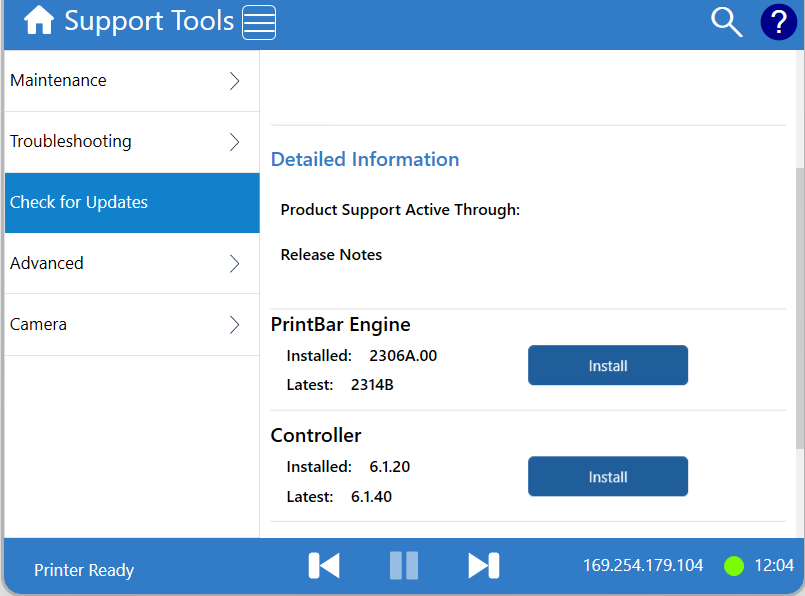
To Update the printer components or to see if updates are available, visit the Updates panel.
Select the Support Tools icon from the home screen.
Select Check for Updates from the menu.
It is important to note that there are actually three separate Callisto printer update installs (and buttons) on the Check for Updates panel. The Main Software Component Version installer will include installation of the Panel, NeuraQ and Printbar Interface. It should always be run first when updating a printer. The Main Software Component installer also makes any Controller (OEM2) and Printbar Engine (BnB) updates available as separate installs with their own installation buttons.
IMPROTANT: Always check for Controller and Printbar Engine installs after running the main Callisto software installer.
Updating the Main Software Component
On the panel that appears you will see the Installed Version and the Latest Version available. You will also see the blue “Install Update Version xx.xx.xx.xx” button with the latest version available for installation. If the button contains the version you want to install (i.e., a later version) then click this button to begin the software installation.
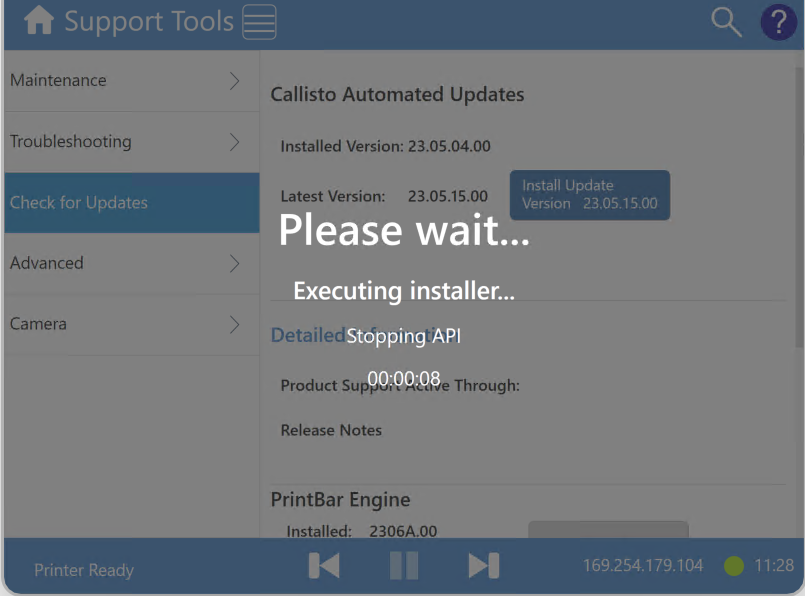
Once you click the installation button, the printer will begin to shut down the subsystems and a screen similar to the one below will be shown.
After this step, the standard NeuraLabel/Neuralog End-User License Agreement will be displayed. This license agreement is also available on the Neuralog and NeuraLabel web site.
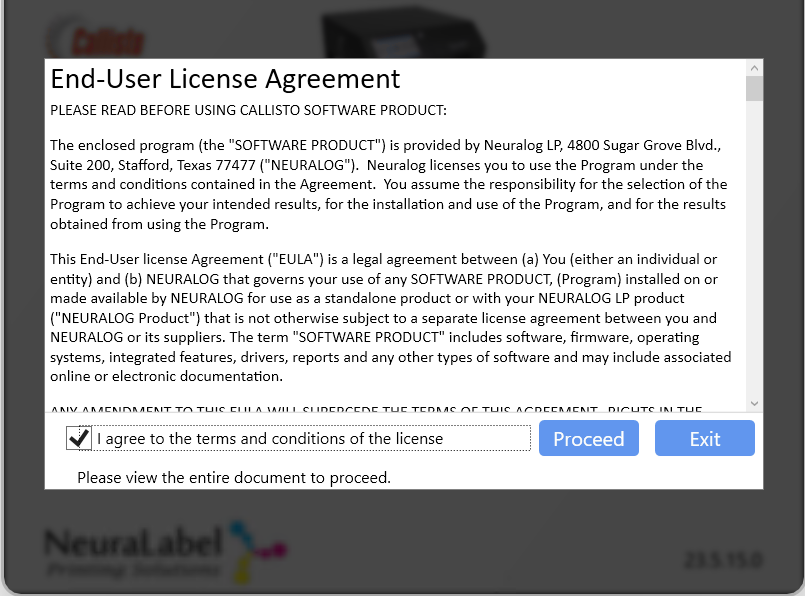
Check the terms and conditions box and click Proceed to start the software update.
Once Proceed is selected, the software installation will begin. You will see the system backing up the current installation; then updating each of the included components. Note that this process takes several minutes.

After the installation is complete, the printer will automatically reboot. Wait for the printer to return to the Printer Ready state before proceeding to the next stop.
Updating the PrintBar Engine
When available, a PrintBar Engine update appears in the Check for Updates panel. You may need to scroll down to see the update button. Install an updated PrintBar Engine whenever an update is available. Please remove any media from the printer for this installation. The update will take a few moments and the printer PrintBar System will reboot. When the printer returns to the Printer Ready state, the installation is complete.
Watch the Installation video for PrintBar Engine and Controller to see it in action.
Updating the Controller (OEM2)
When available, a Controller update appears in the Check for Updates panel. You may need to scroll down to see the update button. You may need to scroll down to see the update. Install an updated Controller whenever printer software has been updated. The update will take a few moments and the printer will reboot. When the printer returns to the Printer Ready state, the installation is complete.
Troubleshooting the PrintBar Engine or Controller Installation
If the PrintBar Engine or Controller Installation fails, the recommended next step is to repeat and try the installation again. On occasion, the printer may be in an “unhappy” state and not accept an update. Fully rebooting the printer almost always corrects this situation and the installation succeeds after the reboot.
If the PrintBar Engine Installation fails, it may be that the printbar has lost connectivity to the Main PCA controller. Contact Neuralog support for a procedure for restoring this connection.
If the Controller installation fails a second time, follow the procedure for manually updating the controller. The instructions for Manually Updating the Controller are found on the Support Library.

")

