

Callisto Preventative Maintenance (PM) is to be performed by qualified service technicians. It is critical to obtain the correct supplies, service parts, printer information, and customer information before visiting the customer site to service the printer. Please review all steps in this PM document before servicing the Callisto printer.
Supplies and Parts Checklist
Supplies
- NeuraLabel Cleaning Kit
- Compressed Air
- Shop Paper Towels
- 91% – 99% Isopropyl Alcohol
- Non-Scratch Scrub Sponge
- Towel or small blanket for use as a drop cloth
- Ink Away Wipes
- Philips Screw Driver (for Board Replacement)
- 7/64” Hex Key (for Board Replacement)
Service Parts
- Service Tray
- Controller Board
Printer Information
- Serial Number
- Software Version Information
- Controller Board Version
- Label or Log printer
- Printer on Network
Customer Information
- Internet Availability
- Media Used
Checklist Summary
Preventative Maintenance Procedure Basic Inspection + Cleaning
Download the printable Preventative Maintenance Worksheet. Print and complete this worksheet as part of the PM.
| Inspection Item | Printer Power | Pass | Repair Required | Notes |
|---|---|---|---|---|
| Vacuum Fan Operation | ON | |||
| Sensor Values (record values) | ON | |||
| Service Tray %; Replace if Needed | ON | |||
| Run Cleaning Sheet | ON | |||
| Clean Printhead if/where Needed | ON | |||
| Clean Output Surface and Zigzag Tray | ON | |||
| Clean Drive Roller | OFF | |||
| Controller Board Replacement (Optional) | OFF |
Preparing, Inspecting, and Blowing Out the Printer
Prepare the Work Area
Before beginning Callisto Preventative Maintenance make sure the printer is on a sturdy table with enough room to work and with good lighting. If the printer is sitting in a roll system, you may need to move it. Note that you will still need access to power.
Inspect the Printer
Before servicing the Callisto printer, inspect it and note any immediate technical issues, printer errors and alerts, and cosmetic problems.
Know the PM Procedure and the Required Printer State
The Callisto Preventative Cleaning includes steps with the printer powered ON and includes steps with the printer powered OFF and completely UNPLUGGED. Make sure the printer is in the correct state before starting that PM step.
There are times when the printer will be tilted and laid on its back so that the underneath of the printer can be accessed. The printer must always be turned OFF when it is laid on its back. Always make sure to protect the printer and table surface with a thick cloth when turning the printer on its back. Note that temporary ink mixing may occur when the printer is turned on its back. Running cleaning routines will restore the printer and flush any ink mixing that occurs.
Be sure to understand which state the printer should be in for each of the Preventative Maintenance steps. If you are not certain, please contact Neuralog support before servicing the printer.
Blow out the Printer
To prepare the printer for servicing, thoroughly blow out the printer with canned air to remove loose debris and paper dust. Wipe off any exposed printer surfaces. Once the printer is free of loose debris, you are ready to move on to the next steps.
Vacuum Fan Check
Check that the vacuum fan is operating.
The vacuum fan settings are accessed under the Setting icon. Whenever the fan setting is modified, the fan turns on for a few seconds, making it easy to verify that the fan is functional. The instructional blog below provides details on how to check the vacuum fan.
NOTE: The default fan setting for label printers is 3500. This is appropriate for most label printers. The default fan setting for well log printers is 4000. This higher fan setting is required for paper media.
Sensors Check
Check and report the printer sensor values. Printer sensors you will be checking are mark, gap and paper present.
The instructional blog provides instructions on how to check all the Callisto Sensors. You will be collecting 3 or 4 readings, depending on the type of media used.
- NO MEDIA READING
- MEDIA PRESENT READING
- GAP READING: (DIE CUT LABELS ONLY)
- BLACK MARK READING: (DIE CUT LABELS WITH BLACK MARK OR WELL LOG PAPER)
If label media has a black mark, verify with the customer that the black mark is used (not media gap) for printing. Place information in notes.
| Media Position/Sensor | Applicable Cases | Mark Sensor | Gap Sensor | Paper Present Sensor |
|---|---|---|---|---|
| No Media | All | |||
| Media Present | All | |||
| Gap (Media Backing) | Die-Cut Media with Matrix Removed | |||
| Black Mark | Die-Cut Media with Black Marks Well Log Paper Any Media with Black Marks |
Describe the media that was used: Well Log Paper, Label Media, other
Service Sled Check
Check the service sled % and record it. If Service Tray Level <=15%, then replace the Service Tray with a new Tray.
When installing or reinstalling a sled, make sure it is installed correctly,
Inspecting the Sled
If the tab is flush, the Service Tray is still in working condition and does not need to be changed.
Tab is flush. Service Tray is good.

If the tab is sticking out past one detent, the Service Tray is low on wipes and will need to be changed soon.
Tab is out.
Service Tray should be replaced.
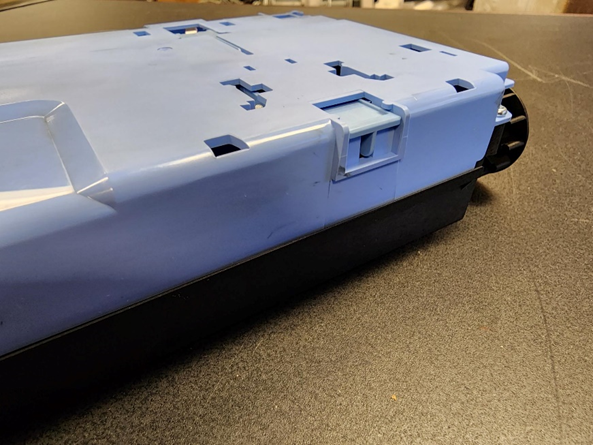
If the tab is sticking out past one detent, the Service Tray is low on wipes and will need to be changed soon.
Tab is fully out.
Service Tray must be replaced.
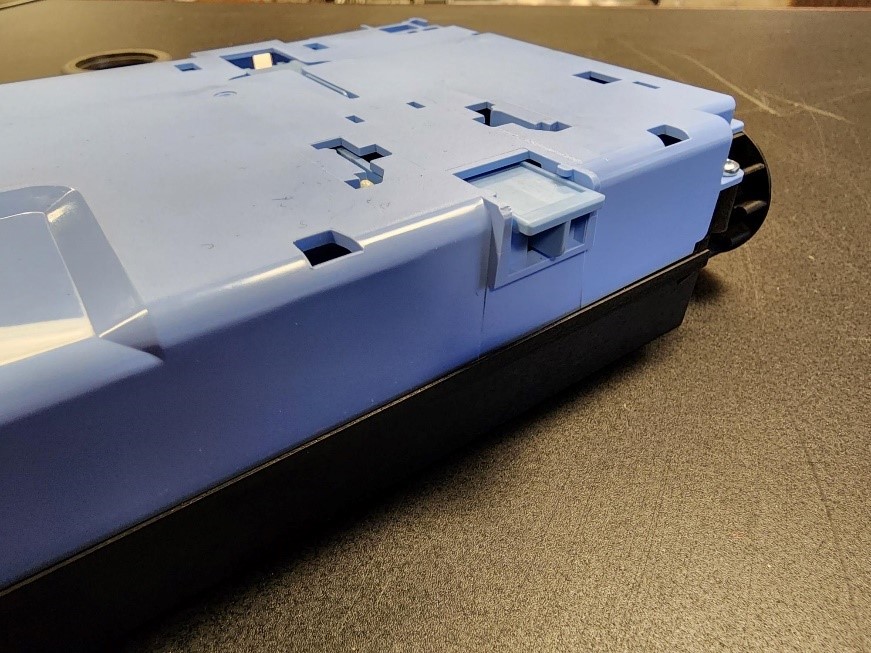
When to Replace the Service Tray for PM
- If the remaining service tray wipes as seen in the Operator Panel indicate percent 15% or less, replace the service tray.
- If the blue tab is indented out to EITHER position (low or out), replace the service tray.
- If the service tray appears damaged or saturated with ink, replace the service tray.
- If the remaining service tray wipes indicate a percent of 40% or less, consult with the customer to see if they would like the service tray to be replaced. Even though the service tray does not require replacement, they may prefer the convenience of it being replaced by a technician.
Cleaning the Print Zone and Using the Cleaning Sheet
Clean the printer using the NeuraLabel Cleaning Kit. The steps include accessing and cleaning the Print Zone (if needed) and running a Cleaning Sheet through the printer media path.
Determine if the Print Zone Needs Cleaning
The Print Zone, that is the actual printhead dies, needs cleaning if there are any streaks or large white lines in the printed image. Streaks or large white lines are normally caused by debris, such as glue or dust, on the print head. Consult with the client, view a recent sample print, or print a quality report on the media used in the printer to check to see if the Print Zone needs to be cleaned. Because the printhead is very delicate, this step should only be done if needed.
Access the Print Zone to Clean it. Be sure to have a NeuraLabel Cleaning Kit on hand for this step. If you do not have a cleaning kit, use only deionized water and lint-free wipes. DO NOT use alcohol or other chemicals on the Callisto printhead. DO NOT use any type of wipe other than lint-free wipes on the Callisto printhead.
Read the instructional blog below and view the associated video for detailed instructions on how to clean the printhead.
Use the Advanced Cleaning Sheet to Clean the Media Path
The Advanced Cleaning Sheet should be used any time a Callisto printer is serviced. The Advanced Cleaning Sheet will remove excess ink and debris from the media path. To use the Advanced Cleaning Sheet, follow the simple detailed instructions provided above. Select this link to move directly to the appropriate section of the video. https://youtu.be/oOh-Um8DY_U?t=170. Run the cleaning sheet through the printer about 3 times.
Output Surface Cleaning
Cleaning the output surface is a critical step for preventative maintenance. Ink and debris tend to collect on the output surface as the media exits the printer.
There are two parts to cleaning the output surface. First, the visible surface at the exit of the printer should be cleaned. After this, the surface near the interior of the printer, which includes zigzag-shaped troughs should be cleaned. The instructional blog provides details for both these cleaning steps.
Drive Roller Cleaning
To prepare the printer for a Drive Roller check and cleaning, completely shut down the printer using the power button. Make sure the printer is completely shut down and the service tray has returned to the home position. Then set the back switch to the OFF position.
The following informational blog provides details for Drive Roller inspection and cleaning.
Board Replacement (Rev J and below)
For some older printers, the Callisto Controller board, or OEM2 board, will need to be replaced and updated to the latest revision board. The current board version needs to be verified before the technician goes to service a printer. The technician should get the printer board revision and pre-plan the visit based on that information. Update the board in the following cases.
Board Replacement Guidelines
- The current Controller Board is revision J or lower. ABCDEFGHIJ
- NeuraLabel support has instructed that the board needs to be replaced.
- K and above boards are not normally replaced as part of PM.
To minimize the risk of damaging delicate parts, service technicians will normally be sent an “OEM1/OEM2 board combo” containing both the OEM1 and OEM2 boards as a pre-assembled unit. The instructional video covers single board or board combo installation.
The replacement Controller Board available to technicians should be revision N or higher and should have the appropriate controller firmware pre-installed. However, the board may require an additional firmware update. The attached OEM1 board in a combo will have updated printer software. Note that there are no revisions of the OEM1 board.
NOTE the Current Board Rev as of 5/25/23: N
NOTE: Required controller (OEM2) firmware for N board: 6.0.35 or later
The following instructional blog provides details for board replacement. Because replacing the board involves first removing the printer cover, the technician should be trained in removing the Callisto cover. The Inspect and Open the Printer video is also available in the NeuraLabel Support Library.
Conditional Update of Software/Firmware
Callisto Software may be updated as part of preventative maintenance when recommended by NeuraLabel Support. A Callisto update includes 3 Callisto software/firmware components that can be updated through the Operator Panel.
When to Update:
- Installation of a new controller board (may require update)
- Required or recommended by Neuralog/NeuraLabel support
- Requested by the end user. Please get approval or participation of Neuralog support.
Install the latest printer software release by running the Callisto installer. Callisto updates are provided directly by NeuraLabel Support, or they may be available for direct download for the web. Once the main software component has been updated, install the latest PrintBar Engine release and the latest Controller release; Controller installation may be required if the controller board has been updated. This support blog gives detailed information on all installation and update steps.
Final Inspection Procedure and Checklist
When PM servicing is complete, use this checklist for to verify the printer is left in good working order.
Check the Printer Setup
- All surfaces appear clean.
- The printer is properly closed and all panels replaced.
- The printer has been returned to its original position if within a roll system and peripherals are reattached.
- The power and network cables are plugged in.
Check the Printer
- Turn on the printer and verify that it fully boots and receives a proper network address.
- If a software or board update was performed, verify and record the new versions.
- Print a Quality Report on test media or the client’s available media.
- If ink mixing has occurred, run cleaning routines until the issue is resolved, usually 3-5 cleaning cycles.
- Have the customer send a sample print to verify the printer is up and running.
- Verify that the customer is able to print.
- Contact NeuraLabel Support if issues arise.